SLUSC05D July 2014 – May 2016 UCC28880
PRODUCTION DATA.
- 1 Features
- 2 Applications
- 3 Description
- 4 Revision History
- 5 Pin Configuration and Functions
- 6 Specifications
- 7 Detailed Description
-
8 Application and Implementation
- 8.1 Application Information
- 8.2
Typical Application
- 8.2.1
12-V, 100-mA Low-Side Buck Converter
- 8.2.1.1 Design Requirements
- 8.2.1.2
Detailed Design Procedure
- 8.2.1.2.1 Custom Design with WEBENCH Tools
- 8.2.1.2.2 Input Stage (RF, D2, D3, C1, C2, L2)
- 8.2.1.2.3 Regulator Capacitor (CVDD)
- 8.2.1.2.4 Freewheeling Diode (D1)Freewheeling Diode (D1) section.
- 8.2.1.2.5 Output Capacitor (CL)
- 8.2.1.2.6 Load Resistor (RL)
- 8.2.1.2.7 Inductor (L1)
- 8.2.1.2.8 Feedback Path (Q1, RFB1, RFB2)
- 8.2.1.3 Application Curves
- 8.2.2 12-V, 100-mA, High-Side Buck Converter
- 8.2.3 Additional UCC28880 Application Topologies
- 8.2.1
12-V, 100-mA Low-Side Buck Converter
- 9 Power Supply Recommendations
- 10Layout
- 11Device and Documentation Support
- 12Mechanical, Packaging, and Orderable Information
10 Layout
10.1 Layout Guidelines
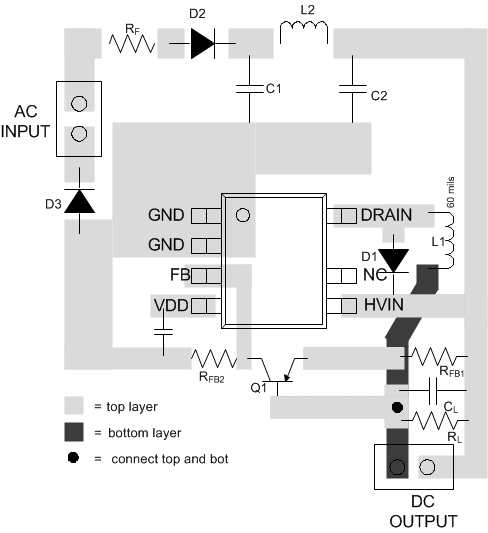
- In both buck and buck-boost low-side configurations, the copper area of the switching node DRAIN should be minimized to reduce EMI.
- Similarly, the copper area of the FB pin should be minimized to reduce coupling to feedback path. Loop CL, Q1, RFB1 should be minimized to reduce coupling to feedback path.
- In high-side buck and buck boost the GND, VDD and FB pins are all part of the switching node so the copper area connected with these pins should be optimized. Large copper area allows better thermal management, but it causes more common mode EMI noise. Use the minimum copper area that is required to handle the thermal dissipation.
- Minimum distance between 700-V coated traces is 1.41 mm (60 mils).
10.2 Layout Example
Figure 29 shows and example PCB layout for UCC28880 in low-side buck configuration.
 Figure 29. UCC28880 Layout Example